

前文我们了解了奇异值分解(SVD)的原理,今天就实战一下,用矩阵的奇异值分解对图片进行压缩.
Learn by doing
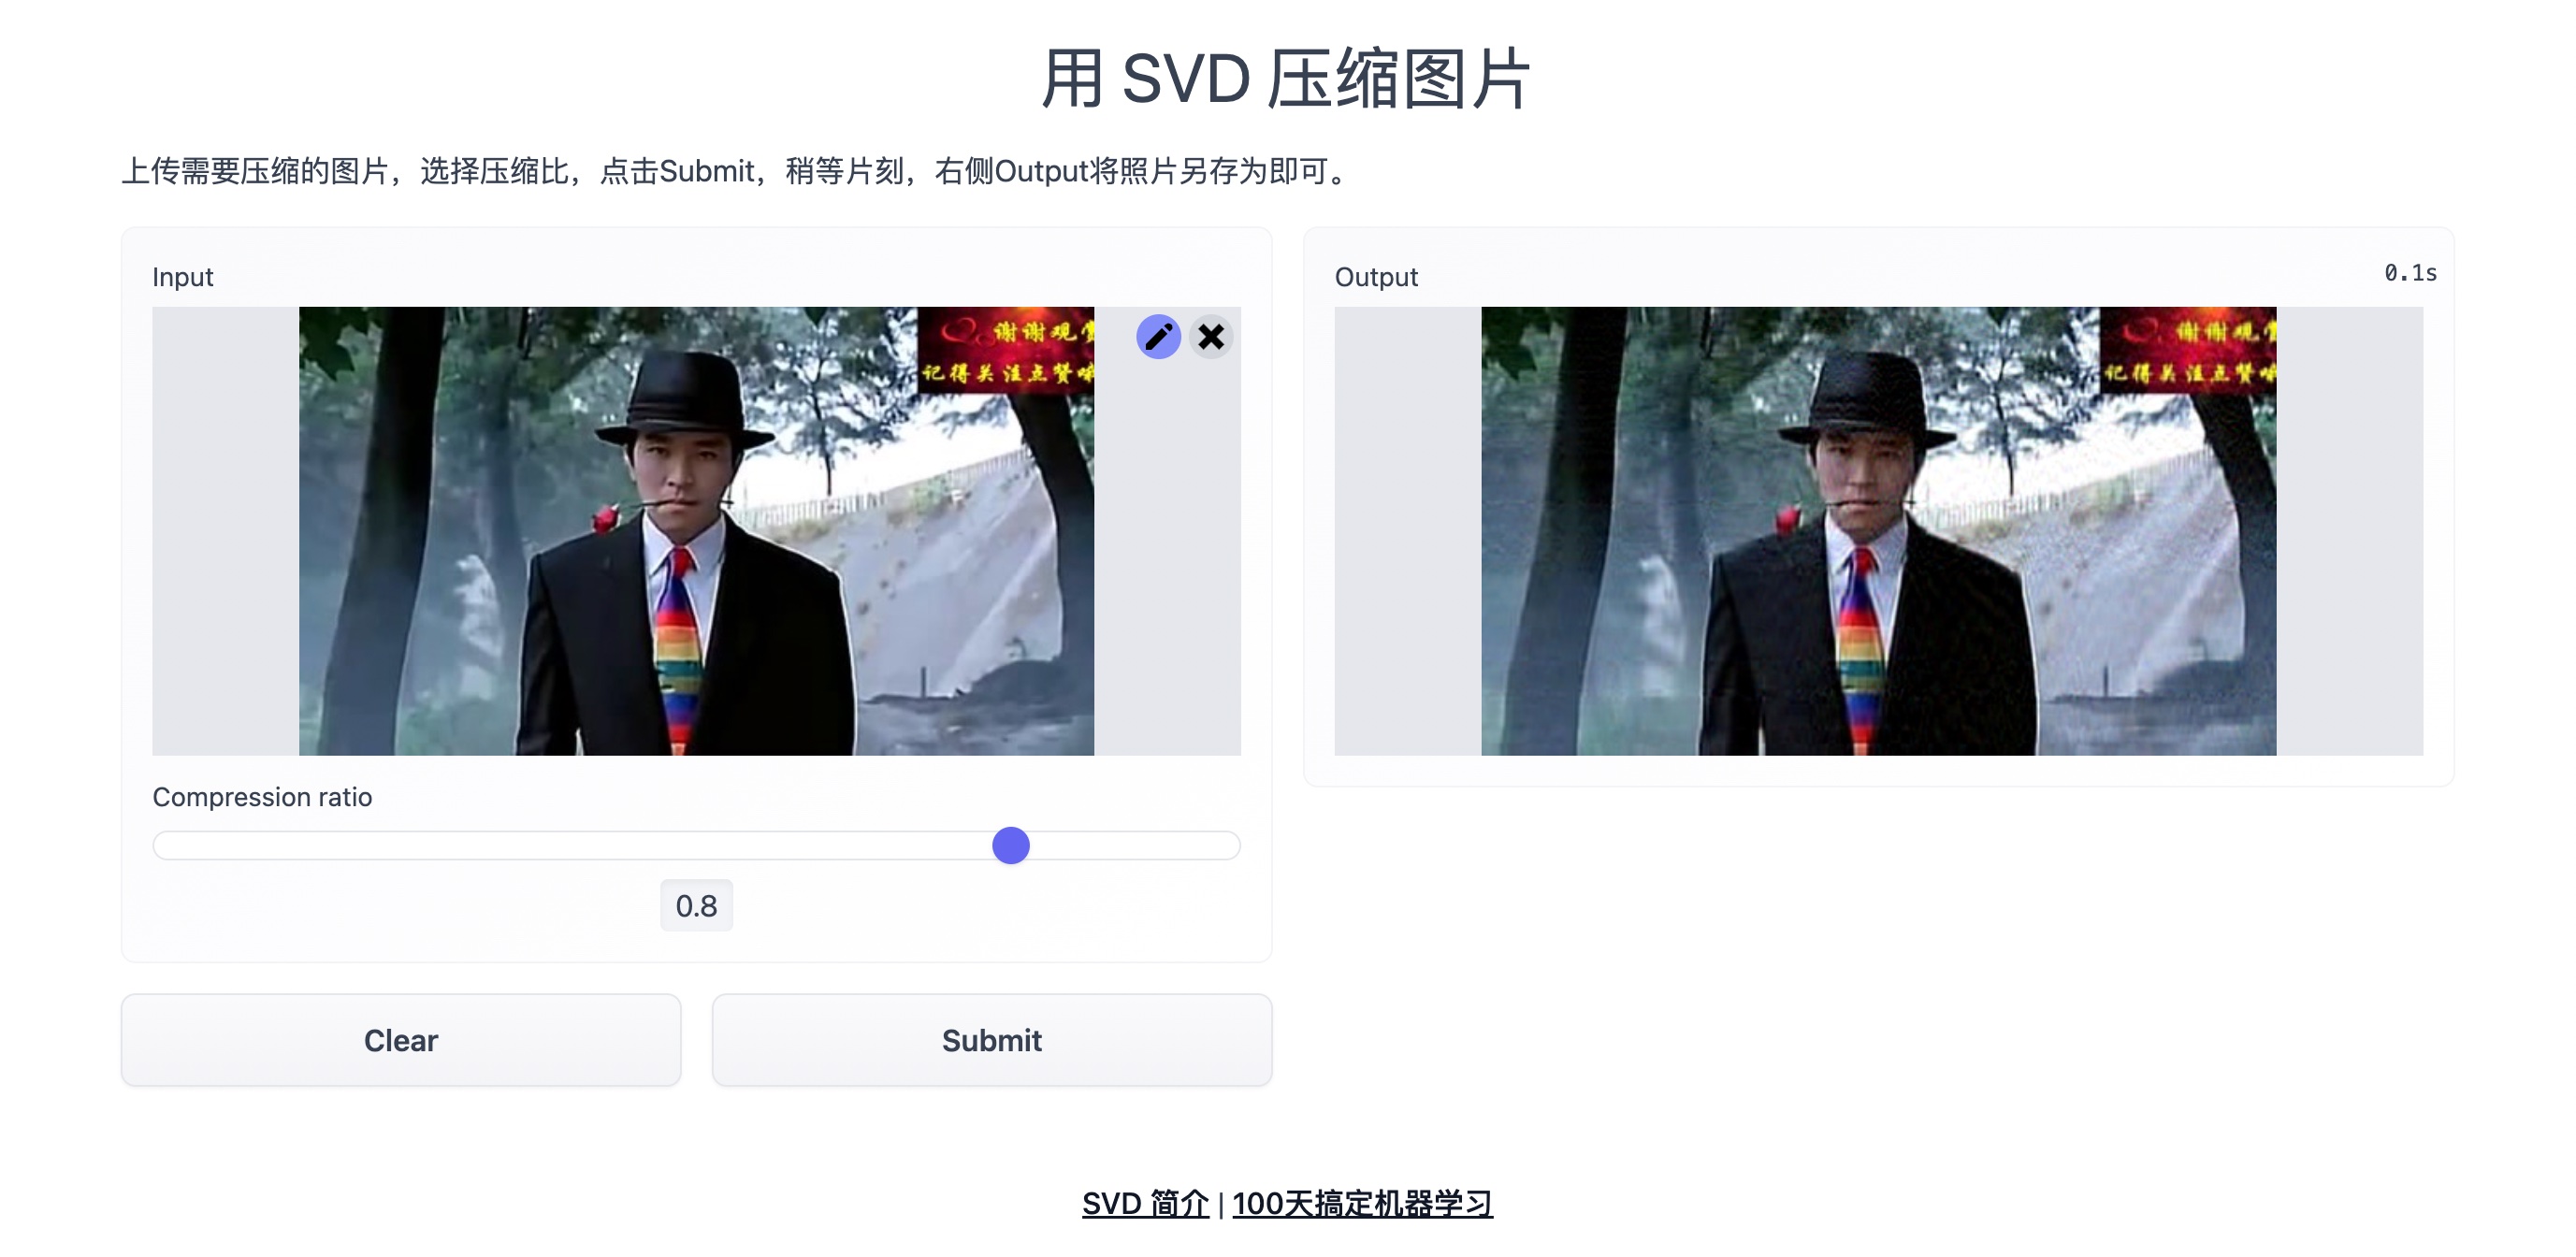
我做了一个在线的图像压缩应用,大家可以感受一下。
https://huggingface.co/spaces/beihai/Image-Compression-with-SVD
功能很简单,上传需要压缩的图片,选择压缩比,提交即可。
下面咱们就一起看看实现过程
用SVD压缩图像
原理很简单:
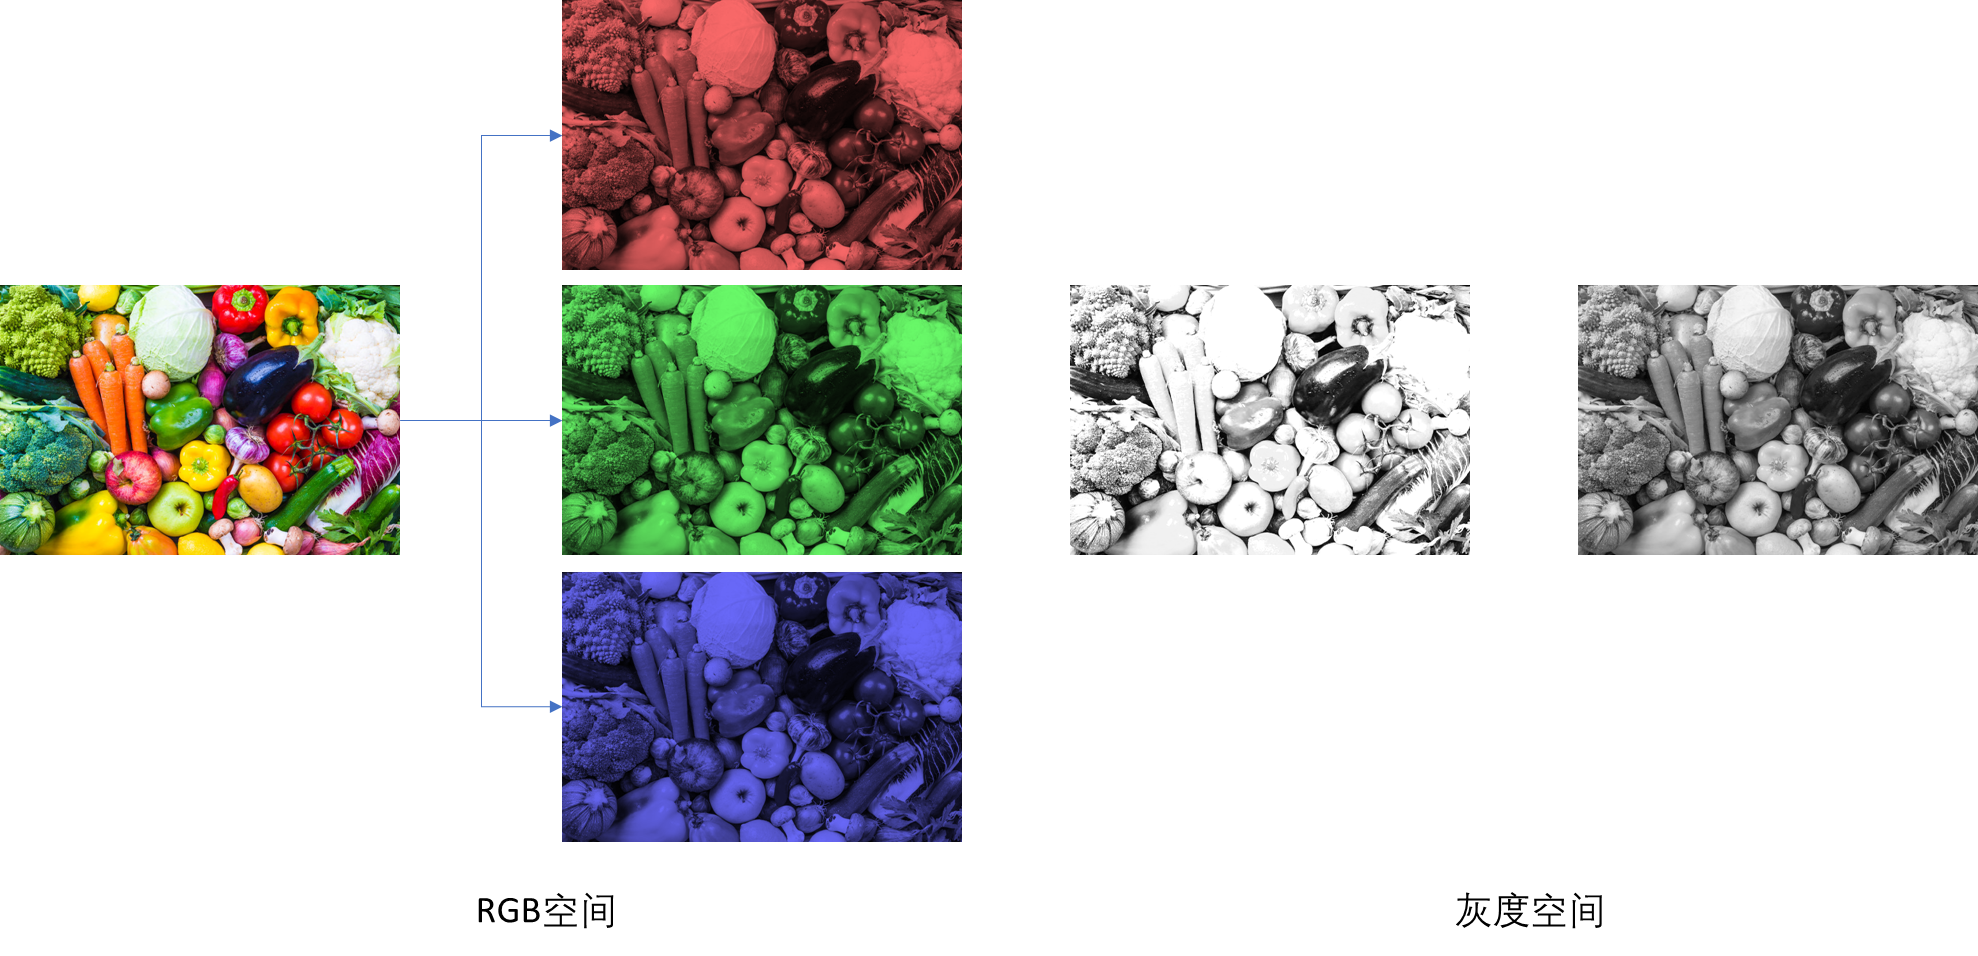
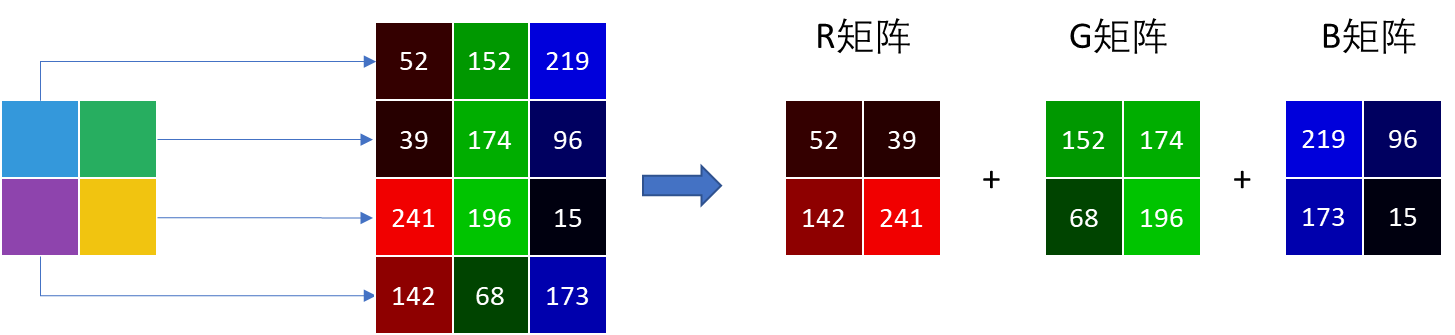
将图片分解为RGB三颜色矩阵,将每个颜色矩阵进行奇异值分解,然后选择指定数量的特征对矩阵进行压缩。
linalg.svd(a, full_matrices=True, compute_uv=True, hermitian=False)
利用PIL包下的Image类读取图片,使用numpy将图片转换为 ndarray 类型,将ndarray类型的数据分解为R、G、B矩阵,利用numpy将三个矩阵进行分解,得到奇异值分解矩阵 ,指定保留奇异值的个数 ,利用矩阵乘法重新得到新的 R,G,B 矩阵,将得到的矩阵利用numpy重组为新的矩阵 I,即得到压缩后的矩阵。
核心代码
完整代码大家可以clone我的huggingface
https://huggingface.co/spaces/beihai/Image-Compression-with-SVD
核心代码1:
p表示奇异值的百分比,根据指定的清晰度提取奇异值清晰度越高,压缩比越低,提取的奇异值的个数也就越多,图片也就越不会失真)
def rebuild_img(u, sigma, v, percent):
    m = len(u)
    n = len(v)
    a = np.zeros((m, n))

    count = (int)(sum(sigma))
    curSum = 0
    k = 0
    while curSum <= count * percent:
        uk = u[:, k].reshape(m, 1)
        vk = v[k].reshape(1, n)
        a += sigma[k] * np.dot(uk, vk)
        curSum += sigma[k]
        k += 1

    a[a < 0] = 0
    a[a > 255] = 255
核心代码2: 主要就是定义inderence函数和gradio前端的实现
import os
os.system("pip install --upgrade pip")
os.system("pip install opencv-python-headless")
import cv2
import numpy as np
import gradio as gr
from func import rebuild_img

def inference(img,k):
    input_img = cv2.imread(img, cv2.IMREAD_COLOR)
    u, sigma, v = np.linalg.svd(input_img[:, :, 0])
    R = rebuild_img(u, sigma, v, k)
    u, sigma, v = np.linalg.svd(input_img[:, :, 1])
    G = rebuild_img(u, sigma, v, k)
    u, sigma, v = np.linalg.svd(input_img[:, :, 2])
    B = rebuild_img(u, sigma, v, k)
    restored_img = np.stack((R, G, B), 2)
    return Image.fromarray(restored_img[:, :, ::-1])


gr.Interface(
    inference,
    [
    gr.inputs.Image(type="filepath", label="Input"),gr.inputs.Slider(0, 1, 0.1,default=0.6,label= 'Compression ratio')],
    gr.outputs.Image(type="pil", label="Output"),
    title=title,
    description=description,
    article=article
    ).launch(enable_queue=True,cache_examples=True,share=True)
上线
Gradio + Huggingface 上线机器学习应用(纯免费)我已经介绍过很多遍了,这里就不赘述了,还不太熟悉的同学请移步我这篇文章:腾讯的这个算法,我搬到了网上,随便玩!
这里就提一下遇到的小问题及解决方法吧。
由于用了cv2,所以要安装opencv-python,但是运行中报错如下:
  File "/home/user/.local/lib/python3.8/site-packages/cv2/__init__.py", line 8, in <module>
    from .cv2 import *
ImportError: libGL.so.1: cannot open shared object file: No such file or directory
针对这个错误,网上有以下方法:
1 yum安装:
yum install libglvnd-glx
2 重新安装opencv包:
pip uninstall opencv-python
pip install opencv-python-headless
第一种方法需要root权限,建议直接第二种方法吧,省事。
参考: https://blog.razrlele.com/p/1920 https://blog.csdn.net/qq_42192693/article/details/121392195

 京公网安备 11010502036488号