

注:

这里将git于github连接的步骤简单描述一下,用以备忘。
第一步
请确保你安装了最新的VS Code.http://code.visualstudio.com/
请确保安装了最新版的Git。https://git-scm.com/download。git安装到环境变量里, 确保任意路径可以访问。
第二步
创建一个全球用户名、全球邮箱,设置全局配置
$ git config –global user.name “用户名” eg:" name " (你的GitHub账号)
$ git config –global user.email “对应邮箱” eg:" name@qq.com "(你的GitHub注册邮箱)
对于连接github还要生成ssh,因为github是用ssh加密传输的。
将你的当前目录定位到 ${ 你的git安装目录 } / usr / bin
然后,输入: ssh-keygen -t rsa -C "配置git时候填写的email"
此后,在需要输入密码的时候可以直接回车,就会忽略连接启动时的密码。

在C盘用户目录下,就会出现一个 .ssh 的文件夹,里面有一个 id_rsa.pub文件,它就是ssh的秘钥,将里面的内容复制到你的github账号中的sshkey内,在user-settings中。添加好以后,可以使用命令:ssh -T git@github.com 测试,如果返回信息正确,说明设置成功。

第三步
去注册的github官网上,创建一个仓库。记住项目地址:
https://github.com/xxx/xxx/xxx
或者:找一个目录执行git clone http://xxx.git(从服务器端克隆git库,当然这个要服务器管理员给你权限和帐号),以后xxx目录就是一个git目录,可以在这个目录下执行git操作
第四步
创建 git 仓库:
mkdir wap
cd wap
git init
touch README.md 新建文件命令
git add README.md
git commit -m "first commit"
git remote add origin https://git.oschina.net/name/package.git
git push -u origin master
已有项目?
cd 进入项目目录
$ git remote add origin git@github.com:flora0103/example.git //关联一个远程库命令, git@github.com:flora0103/example.git 这个是自己远程库
git push -u origin master //关联后,第一次推送master分支的所有内容命令,此后,每次本地提交后,就可以使用命令git push origin master推送最新修改。
正常情况下上面的命令执行完成后,本地文件夹会有一个隐藏的.git文件夹,云端你的仓库里应该会有一个README.md文件。
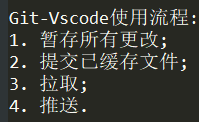
第五步,在vscode中提交代码到仓库
回到vs code打开git工作区就会看到所有代码显示在这里

点击+号,把所有文件提交到暂存区。
然后打开菜单选择--提交已暂存的

然后按提示随便在消息框里输入一个消息,再按ctrl+enter提交

然后把所有暂存的代码push云端,

点击后,会弹出让你输入账号密码,把你托管平台的账号密码输入上去就行了。。。
不出问题的话你整个项目就会提交到云端上了。
在vs中每次更新代码都会要输入账号密码,方便起见,可以配置一下让GIT记住密码账号。
git config --global credential.helper store //在Git Bash输入这个命令就可以了
4、同步代码
这里说下平时修改代码后提交到云端的使用,和本地代码和云端同步
随便打开一个文件,添加一个注释

可以看到git图标有一个提示,打开git工作区可以看到就是修改的这个文件

然后点击右侧的+号,把他暂存起来。
再在消息框里输入消息,按ctrl+enter提交暂存

再点击push提交,代码就提交到云端了。

打***云就可以看到了。。

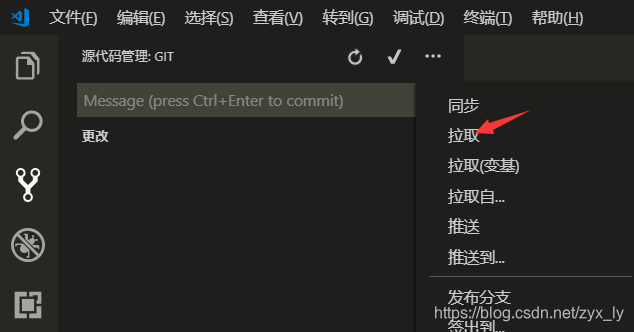
pull使用
比如当你在家里修改了代码提交到云端后,回到公司只需要用vscode打开项目点击菜单中的pull就可以同步过来了。

5、克隆你的项目到本地
回到家后想修改代码,但是电脑没有文件怎么办呢? 往下看
首先你电脑还是的有vscode 和 GIT,,然后用git把上面那些全局配置再执行一次,如下:
git config --global user.name "ASxx"
git config --global user.email "123456789@qq.com"
git config --global credential.helper store
然后打开Git Bash输入以下命令
cd d:/test//指定存放的目录
git clone https://git.oschina.net/name/test.git //你的仓库地址

下载成功,然后就可以用vscode打开项目修改了,修改后提交的步骤还是和上面一样:暂存-提交暂存-push提交到云端就ok了。
提交保存
提交保存的第一步是暂存文件。
第二步是输入提交信息。
第三步然后使用状态栏的提交按钮提交全部更改。

git命令列表
ctrl+shift+P,输入git,会看到VS CODE支持的所有git命令。

撤销操作
输入 Undo Last Commit,撤销上次操作。输入Unstage,撤销暂存。

分支
输入Branch可以创建当前内容的分支。创建分支时需要输入分支名称。


checkout
创建分支后,使用checkout命令可以拉取特定的分支内容。

冲突合并
VS Code 会检测文件冲突,并以<<<<<,>>>>,====和颜***分出来。

解决冲突之后,直接提交就行了。
文件比较
在git文件列表中,单击一个未提交更改的文件,就会打开两个窗口来显示变更的内容。


 京公网安备 11010502036488号