

创建过程
首先看一下Connector的创建过程。
Connector connector = new Connector();
public Connector() {    //默认的连接器协议是nio的http 1.1协议
    this("org.apache.coyote.http11.Http11NioProtocol");
    //创建过程只是简单调用一下构造函数
}//所以可以直接看Http11NioProtocol的创建过程
public Http11NioProtocol() {    super(new NioEndpoint());
}//可以看到在Http11NioProtocol中,自己新建了一个EndPoint这也正好对应了上一节tomcat的结构图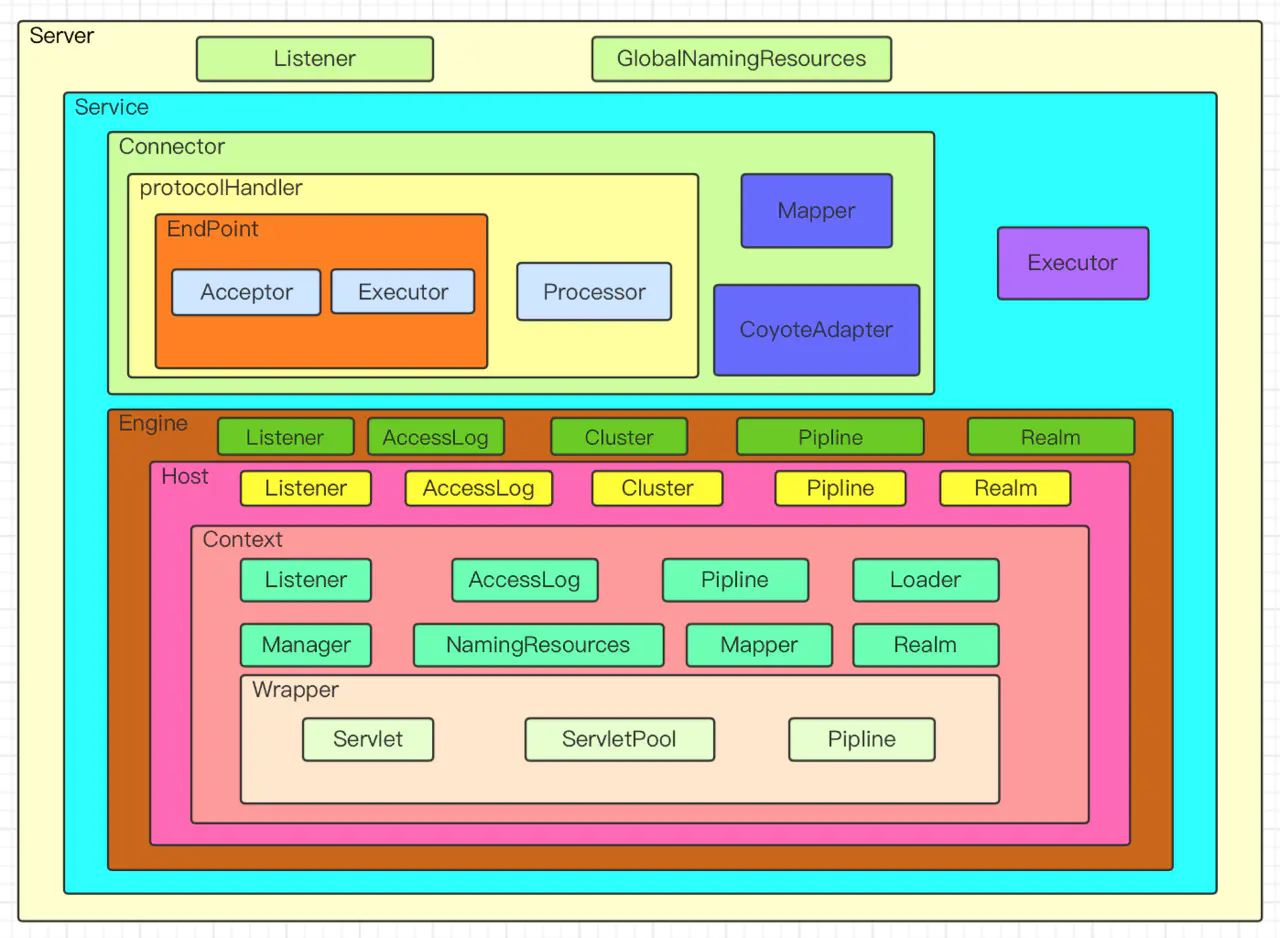
启动过程
创建过程看完了下面来看看启动过程,因为上一节已经说过了tomcat的容器结构,所以启动过程可以直接从Connector的init方法开始
    protected void initInternal() throws LifecycleException {
        ...        try {
            protocolHandler.init();        } catch (Exception e) {
            ...        }    }
Connector的init方法,除了设置一些初始化值外,就是调用protocolHandler的init方法了。所以查看protocolHandler的init方法,
    //查看AbstractProtocol中的init方法
    public void init() throws Exception {
        ...
        String endpointName = getName();
        endpoint.setName(endpointName.substring(1, endpointName.length()-1));
        endpoint.setDomain(domain);
        endpoint.init();
    }
在进行了一些初始化设置之后调用了endpoint的init方法。进入endpoint查看
//进入AbstractEndpoint的init方法
    public final void init() throws Exception {        if (bindOnInit) {
            bindWithCleanup();            bindState = BindState.BOUND_ON_INIT;        }        ...    }        private void bindWithCleanup() throws Exception {        try {            bind();
        } catch (Throwable t) {            ...        }    }        public void bind() throws Exception {
        //初始化ServerSocket        initServerSocket();        ...        selectorPool.open();    }    //这边可以看到初始化ServerSocket的方法,还有初始化了一个selector,但是这个连接器不是在接收连接时候用的,暂时先放一放        protected void initServerSocket() throws Exception {        if (!getUseInheritedChannel()) {
            //绑定端口的方法和我们平时开发都一样。            serverSock = ServerSocketChannel.open();            socketProperties.setProperties(serverSock.socket());            InetSocketAddress addr = new InetSocketAddress(getAddress(), getPortWithOffset());            serverSock.socket().bind(addr,getAcceptCount());
        } else {
            ...        }        serverSock.configureBlocking(true); //mimic APR behavior
    }
init过程到这个就结束了,这个时候端口就已经绑定了,下一步去看看接收的socket如何处理。
查看Connector的start方法。
    protected void startInternal() throws LifecycleException {
        //...
        try {
            protocolHandler.start();        } catch (Exception e) {
            ...        }    }        public void start() throws Exception {        //...
        endpoint.start();        //...
    }        public final void start() throws Exception {        if (bindState == BindState.UNBOUND) {
            //刚刚init的时候已经绑定了,所以这边不会在绑定一次
            bindWithCleanup();            bindState = BindState.BOUND_ON_START;        }        //直接会进入start方法
        startInternal();    }        public void startInternal() throws Exception {        if (!running) {
            running = true;
            paused = false;
            //一些缓存类的初始化
            processorCache = new SynchronizedStack<>(SynchronizedStack.DEFAULT_SIZE,
                    socketProperties.getProcessorCache());            eventCache = new SynchronizedStack<>(SynchronizedStack.DEFAULT_SIZE,
                            socketProperties.getEventCache());            nioChannels = new SynchronizedStack<>(SynchronizedStack.DEFAULT_SIZE,
                    socketProperties.getBufferPool());            // Create worker collection
            if ( getExecutor() == null ) {
                //初始化线程池,这个待会再说
                createExecutor();            }            initializeConnectionLatch();            //先看一下Poller线程和Acceptor线程
            pollers = new Poller[getPollerThreadCount()];
            for (int i=0; i<pollers.length; i++) {
                pollers[i] = new Poller();
                Thread pollerThread = new Thread(pollers[i], getName() + "-ClientPoller-"+i);
                pollerThread.setPriority(threadPriority);                pollerThread.setDaemon(true);
                pollerThread.start();            }            startAcceptorThreads();        }    }
在endpoint启动的过程中,我们看到他启动了两个不同名称的线程一个叫Poller,一个叫Acceptor。这两个线程从名字也可以看出,一个是接收socket的,另一个是分发任务的。分别查看他们代码。
//虽然启动是先启动poller,但是我们需要先查看acceptor
public Acceptor(AbstractEndpoint<?,U> endpoint) {
    //初始化放入endpoint
    this.endpoint = endpoint;
}
    //因为继承了Runnable类,所以查看run方法
    public void run() {
        int errorDelay = 0;
        while (endpoint.isRunning()) {
            //...
            try {
                //如果达到最大连接就阻塞
                endpoint.countUpOrAwaitConnection();
                //...
                try {
                    //...
                    //接收新建立的socket
                    socket = endpoint.serverSocketAccept();
                } catch (Exception ioe) {
                    //...
                }
                //...
                if (endpoint.isRunning() && !endpoint.isPaused()) {
                    //...
                    //在set方法中新socket会被推给poller处理
                    if (!endpoint.setSocketOptions(socket)) {
                        endpoint.closeSocket(socket);
                    }
                } else {
                    endpoint.destroySocket(socket);
                }
            } catch (Throwable t) {
                ...
            }
        }
        state = AcceptorState.ENDED;
    }
acceptor的方法主要分为几步。
- 判断连接数量是否超过限制
- 新建立连接并设置相关属性
- 将接收到的连接推给poller
下面接着看是怎么推送给poller的
    protected boolean setSocketOptions(SocketChannel socket) {
        try {
            //...设置一些属性值
            //在这边会吧任务注册到poller
            getPoller0().register(channel);
        } catch (Throwable t) {
            //...
        }
        return true;
    }

public void register(final NioChannel socket) {
    //注册的过程也很简单,往poller的队列里添加了一个任务
    addEvent(r);
}
接下来就看看poller怎么处理了
    //因为poller也是实现了Runnable接口,所以也直接查看run方法
    public void run() {        // Loop until destroy() is called
        while (true) {
            boolean hasEvents = false;
            try {
                if (!close) {
                    处理任务队列的任务                    hasEvents = events();                    ...                }                if (close) {
                    ...                }            } catch (Throwable x) {
                ...            }            Iterator<SelectionKey> iterator =                keyCount > 0 ?selector.selectedKeys().iterator() : null;
            while (iterator != null && iterator.hasNext()) {
                SelectionKey sk = iterator.next();                NioSocketWrapper attachment = (NioSocketWrapper)sk.attachment();                if (attachment == null) {
                    iterator.remove();                } else {
                    iterator.remove();                    processKey(sk, attachment);                }            }            timeout(keyCount,hasEvents);        }        getStopLatch().countDown();
poller任务分两部,一是处理任务队列,二是处理注册的socket
先看处理任务队列
public boolean events() {
    boolean result = false;
    PollerEvent pe = null;
    for (int i = 0, size = events.size(); i < size && (pe = events.poll()) != null; i++ ) {
        result = true;
        try {
            //处理任务队列相对简单,只是调用一下run方法
            pe.run();            pe.reset();            ...        } catch ( Throwable x ) {
            ...        }    }    return result;
}public void run() {    if (interestOps == OP_REGISTER) {
        try {
            //在run方法中,socket会将自己注册到poller的selector上
            socket.getIOChannel().register(                    socket.getPoller().getSelector(), SelectionKey.OP_READ, socketWrapper);        } catch (Exception x) {
            log.error(sm.getString("endpoint.nio.registerFail"), x);
        }    } else {
        ...    }}
此时刚刚accpetor推送过来的socket已经被注册到poller上了。接下来看看poller对socket的处理
protected void processKey(SelectionKey sk, NioSocketWrapper attachment) {
    try {
        if ( close ) {
            cancelledKey(sk);
        } else if ( sk.isValid() && attachment != null ) {
            if (sk.isReadable() || sk.isWritable() ) {
                if ( attachment.getSendfileData() != null ) {
                    processSendfile(sk,attachment, false);
                } else {
                    unreg(sk, attachment, sk.readyOps());
                    boolean closeSocket = false;
                    //主要看看processSocket方法
                    if (sk.isReadable()) {
                        if (!processSocket(attachment, SocketEvent.OPEN_READ, true)) {
                            closeSocket = true;
                        }
                    }
                    if (!closeSocket && sk.isWritable()) {
                        if (!processSocket(attachment, SocketEvent.OPEN_WRITE, true)) {
                            closeSocket = true;
                        }
                    }
                    if (closeSocket) {
                        cancelledKey(sk);
                    }
                }
            }
        } else {
            //invalid key
            cancelledKey(sk);
        }
    } catch ( CancelledKeyException ckx ) {
        ...
    }
}
public boolean processSocket(SocketWrapperBase<S> socketWrapper,
        SocketEvent event, boolean dispatch) {
    try {
        if (socketWrapper == null) {
            return false;
        }
        //封装了socket任务
        SocketProcessorBase<S> sc = processorCache.pop();
        if (sc == null) {
            sc = createSocketProcessor(socketWrapper, event);
        } else {
            sc.reset(socketWrapper, event);
        }
        //将socket任务丢给线程池执行。
        Executor executor = getExecutor();
        if (dispatch && executor != null) {
            executor.execute(sc);
        } else {
            sc.run();
        }
    } catch (RejectedExecutionException ree) {
        ...
    } catch (Throwable t) {
        ...
    }
    return true;
}
分析到这儿的话,tomcat对于接收连接的处理就差不多了。我们已经了解了acceptor和poller是如何协作的。最后在看看tomcat中线程池。
回到刚刚线程池创建的地方
public void createExecutor() {
    internalExecutor = true;
    //这个队列就是对LinkedBlockingQueue的简单封装
    TaskQueue taskqueue = new TaskQueue();
    TaskThreadFactory tf = new TaskThreadFactory(getName() + "-exec-", daemon, getThreadPriority());
    //线程池也是对于jdk线程池的封装,不同的是在启动是,就已创建好了全部核心线程。
    executor = new ThreadPoolExecutor(getMinSpareThreads(), getMaxThreads(), 60, TimeUnit.SECONDS,taskqueue, tf);
    taskqueue.setParent( (ThreadPoolExecutor) executor);}    public void execute(Runnable command, long timeout, TimeUnit unit) {        submittedCount.incrementAndGet();        try {
            super.execute(command);
        } catch (RejectedExecutionException rx) {
            //在使用tomcat线程池时候执行上面有这个逻辑
            if (super.getQueue() instanceof TaskQueue) {
                final TaskQueue queue = (TaskQueue)super.getQueue();
                try {
                    //如果初次提交任务被拒绝,则会调用TaskQueue的force方法在尝试一次,如果还是失败的话才会抛出异常。
                    if (!queue.force(command, timeout, unit)) {
                        submittedCount.decrementAndGet();                        throw new RejectedExecutionException(sm.getString("threadPoolExecutor.queueFull"));
                    }                } catch (InterruptedException x) {
                    submittedCount.decrementAndGet();                    throw new RejectedExecutionException(x);
                }            } else {
                submittedCount.decrementAndGet();                throw rx;
            }        }    }
作者:吾乃上将军邢道荣
链接:https://juejin.im/post/6850418111750471693
来源:掘金

 京公网安备 11010502036488号