

1 . 前言
Virtual APK是滴滴出行自研的一款优秀的插件化框架,其主要开发人员有任玉刚老师
说到任玉刚老师,他可以说是我Android FrameWork层的启蒙老师。刚接触Android的时候,在拖了几年控件、写了一些CURD操作后,就得出了这样的结论:客户端太无聊了,现在已经完全精通安卓开发了。直到有一天看了一本叫做《Android开发艺术探索》的书,不禁感慨:原来Android开发竟然还能这么玩,之前的认知实在是浅薄
言归正传,Virtual APK的特性和使用方法不是本文重点,如有需要了解更多请移步VirtualAPK的特性和使用方法。本文主要针对Virtual APK的实现做讲解。
2 . 重要的知识点
- Activity启动流程(AMS)
- DexClassLoader
- 动态代理
- 反射
- 广播的动态注册
3 . 宿主App的实现
中心思想:
- 对插件APK进行解析,获取插件APK的信息
- 在框架初始化时,对一系列系统组件和接口进行替换,从而对Activity、Service、ContentProvider的启动和生命周期进行修改和监控,达到欺瞒系统或者劫持系统的目的来启动插件Apk的对应组件。
3.1 插件Apk的解析和加载
插件Apk的加载在PluginManager#loadPlugin方法,在加载完成后,会生成一个LoadedPlugin对象并保存在Map中。LoadedPlugin里保存里插件Apk里绝大多数的重要信息和一个DexClassLoader,这个DexClassLoader是作为插件Apk的类加载器使用。
看下LoadedPlugin的具体实现,注释标明了各个属性的含义:
public LoadedPlugin(PluginManager pluginManager, Context context, File apk) throws Exception {
        // PluginManager
        this.mPluginManager = pluginManager;
        // 宿主Context
        this.mHostContext = context;
        // 插件apk路径
        this.mLocation = apk.getAbsolutePath();
        this.mPackage = PackageParserCompat.parsePackage(context, apk, PackageParser.PARSE_MUST_BE_APK);
        // 插件apk metadata
        this.mPackage.applicationInfo.metaData = this.mPackage.mAppMetaData;
        // 插件apk package信息
        this.mPackageInfo = new PackageInfo();
        this.mPackageInfo.applicationInfo = this.mPackage.applicationInfo;
        this.mPackageInfo.applicationInfo.sourceDir = apk.getAbsolutePath();
        // 插件apk 签名信息
        if (Build.VERSION.SDK_INT >= 28
            || (Build.VERSION.SDK_INT == 27 && Build.VERSION.PREVIEW_SDK_INT != 0)) { // Android P Preview
            try {
                this.mPackageInfo.signatures = this.mPackage.mSigningDetails.signatures;
            } catch (Throwable e) {
                PackageInfo info = context.getPackageManager().getPackageInfo(context.getPackageName(), PackageManager.GET_SIGNATURES);
                this.mPackageInfo.signatures = info.signatures;
            }
        } else {
            this.mPackageInfo.signatures = this.mPackage.mSignatures;
        }
        // 插件apk 包名
        this.mPackageInfo.packageName = this.mPackage.packageName;
        // 如果已经加载过相同的apk, 抛出异常
        if (pluginManager.getLoadedPlugin(mPackageInfo.packageName) != null) {
            throw new RuntimeException("plugin has already been loaded : " + mPackageInfo.packageName);
        }

        this.mPackageInfo.versionCode = this.mPackage.mVersionCode;
        this.mPackageInfo.versionName = this.mPackage.mVersionName;
        this.mPackageInfo.permissions = new PermissionInfo[0];
        this.mPackageManager = createPluginPackageManager();
        this.mPluginContext = createPluginContext(null);
        this.mNativeLibDir = getDir(context, Constants.NATIVE_DIR);
        this.mPackage.applicationInfo.nativeLibraryDir = this.mNativeLibDir.getAbsolutePath();
        // 创建插件的资源管理器
        this.mResources = createResources(context, getPackageName(), apk);
        // 创建 一个dexClassLoader
        this.mClassLoader = createClassLoader(context, apk, this.mNativeLibDir, context.getClassLoader());

        tryToCopyNativeLib(apk);

        // Cache instrumentations
        Map<ComponentName, InstrumentationInfo> instrumentations = new HashMap<ComponentName, InstrumentationInfo>();
        for (PackageParser.Instrumentation instrumentation : this.mPackage.instrumentation) {
            instrumentations.put(instrumentation.getComponentName(), instrumentation.info);
        }
        this.mInstrumentationInfos = Collections.unmodifiableMap(instrumentations);
        this.mPackageInfo.instrumentation = instrumentations.values().toArray(new InstrumentationInfo[instrumentations.size()]);

        // Cache activities
        // 保存插件apk的Activity信息
        Map<ComponentName, ActivityInfo> activityInfos = new HashMap<ComponentName, ActivityInfo>();
        for (PackageParser.Activity activity : this.mPackage.activities) {
            activity.info.metaData = activity.metaData;
            activityInfos.put(activity.getComponentName(), activity.info);
        }
        this.mActivityInfos = Collections.unmodifiableMap(activityInfos);
        this.mPackageInfo.activities = activityInfos.values().toArray(new ActivityInfo[activityInfos.size()]);

        // Cache services
        // 保存插件apk的Service信息
        Map<ComponentName, ServiceInfo> serviceInfos = new HashMap<ComponentName, ServiceInfo>();
        for (PackageParser.Service service : this.mPackage.services) {
            serviceInfos.put(service.getComponentName(), service.info);
        }
        this.mServiceInfos = Collections.unmodifiableMap(serviceInfos);
        this.mPackageInfo.services = serviceInfos.values().toArray(new ServiceInfo[serviceInfos.size()]);

        // Cache providers
        // 保存插件apk的ContentProvider信息
        Map<String, ProviderInfo> providers = new HashMap<String, ProviderInfo>();
        Map<ComponentName, ProviderInfo> providerInfos = new HashMap<ComponentName, ProviderInfo>();
        for (PackageParser.Provider provider : this.mPackage.providers) {
            providers.put(provider.info.authority, provider.info);
            providerInfos.put(provider.getComponentName(), provider.info);
        }
        this.mProviders = Collections.unmodifiableMap(providers);
        this.mProviderInfos = Collections.unmodifiableMap(providerInfos);
        this.mPackageInfo.providers = providerInfos.values().toArray(new ProviderInfo[providerInfos.size()]);

        // 将所有静态注册的广播全部改为动态注册
        Map<ComponentName, ActivityInfo> receivers = new HashMap<ComponentName, ActivityInfo>();
        for (PackageParser.Activity receiver : this.mPackage.receivers) {
            receivers.put(receiver.getComponentName(), receiver.info);

            BroadcastReceiver br = BroadcastReceiver.class.cast(getClassLoader().loadClass(receiver.getComponentName().getClassName()).newInstance());
            for (PackageParser.ActivityIntentInfo aii : receiver.intents) {
                this.mHostContext.registerReceiver(br, aii);
            }
        }
        this.mReceiverInfos = Collections.unmodifiableMap(receivers);
        this.mPackageInfo.receivers = receivers.values().toArray(new ActivityInfo[receivers.size()]);

        // try to invoke plugin's application
        // 创建插件apk的Application对象
        invokeApplication();
    }
3.2 Activity的启动处理及生命周期管理
Virtual APK启动插件APK中Activity的整体方案:
- Hook Instrumentaion 和主线程Halder的callback,在重要启动过程节点对Intent或Activity进行替换
- 在宿主APP中预先设置一些
插桩Activity,这些插桩Activity并不会真正的启动,而是对AMS进行欺骗。如果启动的Activity是插件APK中的,则根据该Actiivty的启动模式选择合适的插桩Activity, AMS在启动阶段对插桩Activity处理后,在创建Activity实例阶段,实际创建插件APK中要启动的Activity。
3.2.1 插桩Activity的声明:
插桩Activity有很多个,挑一些看一下:
 <!-- Stub Activities -->
        <activity android:exported="false" android:name=".A$1" android:launchMode="standard"/>
        <activity android:exported="false" android:name=".A$2" android:launchMode="standard"
            android:theme="@android:style/Theme.Translucent" />

        <!-- Stub Activities -->
        <activity android:exported="false" android:name=".B$1" android:launchMode="singleTop"/>
        <activity android:exported="false" android:name=".B$2" android:launchMode="singleTop"/>
        <activity android:exported="false" android:name=".B$3"
3.2.2 hook Instrumentation
- 将系统提供的Instrumentation替换为自定义的VAInstrumentation,将主线程Handler的Callback也替换为VAInstrumentation(VAInstrumentation 实现了Handler.Callback接口)
     protected void hookInstrumentationAndHandler() {
        try {
            // 获取当前进程的activityThread
            ActivityThread activityThread = ActivityThread.currentActivityThread();
            // 获取当前进程的Instrumentation
            Instrumentation baseInstrumentation = activityThread.getInstrumentation();
            // 创建自定义Instrumentation
            final VAInstrumentation instrumentation = createInstrumentation(baseInstrumentation);
            // 将当前进程原有的Instrumentation对象替换为自定义的
            Reflector.with(activityThread).field("mInstrumentation").set(instrumentation);
            // 将当前进程原有的主线程Hander的callback替换为自定义的
            Handler mainHandler = Reflector.with(activityThread).method("getHandler").call();
            Reflector.with(mainHandler).field("mCallback").set(instrumentation);
            this.mInstrumentation = instrumentation;
            Log.d(TAG, "hookInstrumentationAndHandler succeed : " + mInstrumentation);
        } catch (Exception e) {
            Log.w(TAG, e);
        }
    }
3.2.3 启动Activity时对AMS进行欺骗
如果我们熟悉Activity启动流程的话,我们一定知道Activity的启动和生命周期管理,都间接通过Instrumentation进行管理的。--如果不熟悉也没关系,可以看我之前写的AMS系列文章,看完保证秒懂(雾)。VAInstrumentation重写了这个类的一些重要方法,我们根据Activity启动流程一个一个说
3.2.3.1 execStartActivity
这个方法有很多个重载,挑其中一个:
    public ActivityResult execStartActivity(Context who, IBinder contextThread, IBinder token, Activity target, Intent intent, int requestCode) {
        // 对原始Intent进行处理
        injectIntent(intent);
        return mBase.execStartActivity(who, contextThread, token, target, intent, requestCode);
    }
injectIntent方法对Intent的处理在ComponentsHandler#markIntentIfNeeded方法,对原始Intent进行解析,获取目标Actiivty的包名和类名,如果目标Activity的包名和当前进程不同且该包名对应的LoadedPlugin对象存在,则说明它是我们加载过的插件APK中的Activity,则对该Intent的目标进行替换:
   public void markIntentIfNeeded(Intent intent) {
        ...
        String targetPackageName = intent.getComponent().getPackageName();
        String targetClassName = intent.getComponent().getClassName();
        // 判断是否需要启动的是插件Apk的Activity
        if (!targetPackageName.equals(mContext.getPackageName()) && mPluginManager.getLoadedPlugin(targetPackageName) != null) {
            ...
            // 将原始Intent的目标Acitivy替换为预设的插桩Activity中的一个
            dispatchStubActivity(intent);
        }
    }
dispatchStubActivity方法根据原始Intent的启动模式选择合适的插桩Activity,将原始Intent中的类名修改为插桩Activity的类名,示例代码:
 case ActivityInfo.LAUNCH_SINGLE_TOP: {
                usedSingleTopStubActivity = usedSingleTopStubActivity % MAX_COUNT_SINGLETOP + 1;
                stubActivity = String.format(STUB_ACTIVITY_SINGLETOP, corePackage, usedSingleTopStubActivity);
                break;
            }
            case ActivityInfo.LAUNCH_SINGLE_TASK: {
                usedSingleTaskStubActivity = usedSingleTaskStubActivity % MAX_COUNT_SINGLETASK + 1;
                stubActivity = String.format(STUB_ACTIVITY_SINGLETASK, corePackage, usedSingleTaskStubActivity);
                break;
            }
            case ActivityInfo.LAUNCH_SINGLE_INSTANCE: {
                usedSingleInstanceStubActivity = usedSingleInstanceStubActivity % MAX_COUNT_SINGLEINSTANCE + 1;
                stubActivity = String.format(STUB_ACTIVITY_SINGLEINSTANCE, corePackage, usedSingleInstanceStubActivity);
                break;
            }
3.2.3.2 newActivity
如果只是对原始Intent进行替换,那么最终启动的会是插桩Activity,这显然达不到启动插件Apk中Acitivty的目的,在Activity实例创建阶段,还需要对实际创建的Actiivty进行替换,方法在VAInstrumentation#newActivity:
@Override
    public Activity newActivity(ClassLoader cl, String className, Intent intent) throws InstantiationException, IllegalAccessException, ClassNotFoundException {
        try {
            cl.loadClass(className);
            Log.i(TAG, String.format("newActivity[%s]", className));

        } catch (ClassNotFoundException e) {
            ComponentName component = PluginUtil.getComponent(intent);

            String targetClassName = component.getClassName();
            Log.i(TAG, String.format("newActivity[%s : %s/%s]", className, component.getPackageName(), targetClassName));

            LoadedPlugin plugin = this.mPluginManager.getLoadedPlugin(component);
            // 使用在LoadedPlugin对象中创建的DexClassLoader进行类加载,该ClassLoader指向插件APK所在路径
            Activity activity = mBase.newActivity(plugin.getClassLoader(), targetClassName, intent);
            activity.setIntent(intent);
            // 插件Activity实例创建后,将Resource替换为插件APK的资源
            Reflector.QuietReflector.with(activity).field("mResources").set(plugin.getResources());

            return newActivity(activity);
        }

        return newActivity(mBase.newActivity(cl, className, intent));
    }
如果我们启动的是插件APK里的Activity,这个方法的Catch语句块是一定会被执行的,因为入参className已经被替换为插桩Activity的,但是我们只是在宿主App的AndroidManifest.xml中定义了这些Actiivty,并没有真正的实现。在进入Catch语句块后,使用LoadedPlugin中保存的DexClassloader进行Activity的创建。
3.2.3.3 AMS对插件APK中的Activity管理
看到这里,可能就会有同学有问题了,你把要启动的Activity给替换了,但是AMS中不是还记录的是插桩Actiivty么,那么这个Activity实例后续跟AMS的交互怎么办?那岂不是在AMS中的记录找不到了?放心,不会出现这个问题的。复习之前AMS系列文章我们就会知道,AMS中对Activity管理的依据是一个叫appToken的Binder实例,在客户端对应的token会在Instrumentation#newActivity执行完成后调用Activity#attach方法传递给Actiivty。
这也是为什么对AMS进行欺骗这种插件化方案可行的原因,因为后续管理是使用的token,如果Android使用className之类的来管理的话,恐怕这种方案就不太好实现了。
3.2.3.4 替换Context、applicaiton、Resources
在系统创建插件Activity的Context创建完成之后,需要将其替换为PluginContext,PluginContext和Context的区别是其内部保存有一个LoadedPlugin对象,方便对Context中的资源进行替换。代码在VAInstrumentaiton#injectActivity,调用处在VAInstrumentaiton#callActivityOnCreate
protected void injectActivity(Activity activity) {
        final Intent intent = activity.getIntent();
        if (PluginUtil.isIntentFromPlugin(intent)) {
            Context base = activity.getBaseContext();
            try {
                LoadedPlugin plugin = this.mPluginManager.getLoadedPlugin(intent);
                Reflector.with(base).field("mResources").set(plugin.getResources());
                Reflector reflector = Reflector.with(activity);
                reflector.field("mBase").set(plugin.createPluginContext(activity.getBaseContext()));
                reflector.field("mApplication").set(plugin.getApplication());

                // set screenOrientation
                ActivityInfo activityInfo = plugin.getActivityInfo(PluginUtil.getComponent(intent));
                if (activityInfo.screenOrientation != ActivityInfo.SCREEN_ORIENTATION_UNSPECIFIED) {
                    activity.setRequestedOrientation(activityInfo.screenOrientation);
                }

                // for native activity
                ComponentName component = PluginUtil.getComponent(intent);
                Intent wrapperIntent = new Intent(intent);
                wrapperIntent.setClassName(component.getPackageName(), component.getClassName());
                wrapperIntent.setExtrasClassLoader(activity.getClassLoader());
                activity.setIntent(wrapperIntent);

            } catch (Exception e) {
                Log.w(TAG, e);
            }
        }
    }
3.3 Service的处理
Virtual APK启动插件APK中Activity的整体方案:
- 使用动态代理代理宿主APP中所有关于Service的请求
- 判断是否为插件APK中的Service,如果不是,则说明为宿主 APP中的,直接打开即可
- 如果是插件APK中的Service,则判断是否为远端Service,如果是远端Service,则启动RemoteService,并在其StartCommand方法中根据所代理的生命周期方法进行处理
- 如果是本地Service,则启动LocalService,并在其StartCommand方法中根据所代理的生命周期方法进行处理
3.3.1 插件化框架初始化时代理系统的IActivityManager
IActivityManager是AMS的实现接口,它的实现类分别是ActivityManagerService和其proxy

这里我们需要代理的是Proxy,实现方法在PluginManager#hookSystemServices
 protected void hookSystemServices() {
        try {
            Singleton<IActivityManager对象> defaultSingleton;
            // 获取IActivityManager对象
            if (Build.VERSION.SDK_INT >= Build.VERSION_CODES.O) {
                defaultSingleton = Reflector.on(ActivityManager.class).field("IActivityManagerSingleton").get();
            } else {
                defaultSingleton = Reflector.on(ActivityManagerNative.class).field("gDefault").get();
            }
            IActivityManager origin = defaultSingleton.get();
            // 创建activityManager对象的动态代理
            IActivityManager activityManager对象的动态代理 = (IActivityManager) Proxy.newProxyInstance(mContext.getClassLoader(), new Class[] { IActivityManager.class },
                createActivityManagerProxy(origin));

            // 使用动态代理替换之前的IActivityManager对象实例
            Reflector.with(defaultSingleton).field("mInstance").set(activityManagerProxy);

            if (defaultSingleton.get() == activityManagerProxy) {
                this.mActivityManager = activityManagerProxy;
                Log.d(TAG, "hookSystemServices succeed : " + mActivityManager);
            }
        } catch (Exception e) {
            Log.w(TAG, e);
        }
    }
通过将动态代理对系统创建的ActivityManager的proxy进行替换,这样,调用AMS方法时,会转到ActivityManagerProxy的invoke方法,并根据方法名对Service的生命周期进行管理,生命周期方法较多,挑选其中一个:
@Override
    public Object invoke(Object proxy, Method method, Object[] args) throws Throwable {
        if ("startService".equals(method.getName())) {
            try {
                return startService(proxy, method, args);
            } catch (Throwable e) {
                Log.e(TAG, "Start service error", e);
            }
        }
startService:
 protected Object startService(Object proxy, Method method, Object[] args) throws Throwable {
        IApplicationThread appThread = (IApplicationThread) args[0];
        Intent target = (Intent) args[1];
        ResolveInfo resolveInfo = this.mPluginManager.resolveService(target, 0);
        if (null == resolveInfo || null == resolveInfo.serviceInfo) {
            //  插件中没找到,说明是宿主APP自己的Service
            return method.invoke(this.mActivityManager, args);
        }
        // 启动插件APK中的Service
        return startDelegateServiceForTarget(target, resolveInfo.serviceInfo, null, RemoteService.EXTRA_COMMAND_START_SERVICE);
    }
startDelegateServiceForTarget中会调用wrapperTargetIntent处理,最终在RemoteService或者LocalService的onStartCommand中对Service的各生命周期处理。
需要注意的是,在RemoteService中需要重新对APK进行解析和装载,生成LoadedPlugin,因为它运行在另一个进程中。
这也说明插件APK的Service进程如果声明了多个是无效的,因为他们最终都会运行在宿主RemoteService所在进程。
3.4 ContentProvider的处理
ContentProvicer的处理和Service是类似的,不多说了。
4 . 插件App的实现
插件APP理论上并不需要做什么特殊处理,唯一需要注意的是资源文件的冲突问题,因此,需要在插件工程app目录下的build.gradle中添加如下代码:
virtualApk {
    packageId = 0x6f // the package id of Resources.
    targetHost = '../../VirtualAPK/app' // the path of application module in host project.
    applyHostMapping = true //optional, default value: true.
}
它的作用是在插件APK编译时对资源ID进行重写,处理方法在ResourceCollector.groovy文件的collect方法:
 def collect() {

        //1、First, collect all resources by parsing the R symbol file.
        parseResEntries(allRSymbolFile, allResources, allStyleables)

        //2、Then, collect host resources by parsing the host apk R symbol file, should be stripped.
        parseResEntries(hostRSymbolFile, hostResources, hostStyleables)

        //3、Compute the resources that should be retained in the plugin apk.
        filterPluginResources()

        //4、Reassign the resource ID. If the resource entry exists in host apk, the reassign ID
        //   should be same with value in host apk; If the resource entry is owned by plugin project,
        //   then we should recalculate the ID value.
        reassignPluginResourceId()

        //5、Collect all the resources in the retained AARs, to regenerate the R java file that uses the new resource ID
        vaContext.retainedAarLibs.each {
            gatherReservedAarResources(it)
        }
    }
首先获取插件app和宿主app的资源集合,然后寻找其中冲突的资源id进行修改,修改id是 reassignPluginResourceId方法:
private void reassignPluginResourceId() {
        // 对资源ID根据typeId进行排序
        resourceIdList.sort { t1, t2 ->
            t1.typeId - t2.typeId
        }

        int lastType = 1
        // 重写资源ID
        resourceIdList.each {
            if (it.typeId < 0) {
                return
            }
            def typeId = 0
            def entryId = 0
            typeId = lastType++
            pluginResources.get(it.resType).each {
                it.setNewResourceId(virtualApk.packageId, typeId, entryId++)
            }
        }
    }
这里要说一下资源ID的组成:
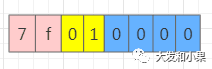
资源ID是一个32位的16进制整数,前8位代表app, 接下来8位代表typeId(string、layout、id等),从01开始累加,后面四位为资源id,从0000开始累加。随便反编译了一个apk,看一下其中一部分的结构:
对资源ID的遍历使用了双重循环,外层循环从01开始对typeId进行遍历,内层循环从0000开始对typeId对应的资源ID进行遍历,并且在内层循环调用setNewResourceId进行重写:
  public void setNewResourceId(packageId, typeId, entryId) {
        newResourceId = packageId << 24 | typeId << 16 | entryId
    }
packageId是我们在build.gradle中定义的virtualApk.packageId,将其左移24位,与资源id的前8位对应,typeId与第9-16位对应,后面是资源id
这样,在插件app编译过程中就完成了冲突资源id的替换,后面也不会有冲突的问题了
5 . 总结
回顾整个Virtual APK的实现,其实逻辑并不是特别复杂,但是可以看到作者们对AMS以及资源加载、类加载器等API的熟悉程度,如果不是对这些知识体系特别精通的话,是很难实现的,甚至连思路都不可能有,这也是我们学习源码的意义所在。
本文转自 https://www.androidos.net.cn/doc/2021/10/13/1024.html,如有侵权,请联系删除。
相关视频推荐
【B站超详细讲解】Android开源库最新完整版课程!深入底层原理,案例+项目实战讲解通俗易懂
【合集】全网超详细的Android开源框架使用学习(组件化/集成化/RxJava/IOC/AOP/MVP/网络架构/Google标准化架构/热修复设计)

 京公网安备 11010502036488号