前言
随着Android应用开发技术的不断发展和成熟,很开发者越来越关注着Android应用架构的设计。目前,Android的应用架构主要有MVC、MVP和MVVM模式,我们就来说一下MVVM模式。
MVP模式
MVVM模式可以说是MVP模式的进一步发展,所以先来了解一下MVP模式。
MVP (Model-View-Presenter) 模式的结构如下图所示:

MVP模式将应用分为三层:Model层主要负责数据的提供,View层主要负责界面的显示,Presenter层主要负责业务逻辑的处理。
在MVP模式中,Model层和View层不能直接通信,Presenter层负责充当中间人,实现Model层和View层之间的间接通信。View层和Presenter层互相持有对方的引用,实现View层和Presenter层之间的通信。
MVP模式的主要优点是:分离了Model层和View层,分离了视图操作和业务逻辑,降低了耦合。
MVVM模式
MVVM (Model-View-ViewModel) 模式的结构如下图所示:

MVVM模式与MVP模式一样,也将应用分为三层,并且各个对应的层的职责相似:
- Model层,主要负责数据的提供。Model层提供业务逻辑的数据结构(比如,实体类),提供数据的获取(比如,从本地数据库或者远程网络获取数据),提供数据的存储。
- View层,主要负责界面的显示。View层不涉及任何的业务逻辑处理,它持有ViewModel层的引用,当需要进行业务逻辑处理时通知ViewModel层。
- ViewModel层,主要负责业务逻辑的处理。ViewModel层不涉及任何的视图操作。通过官方提供的Data Binding库,View层和ViewModel层中的数据可以实现绑定,ViewModel层中数据的变化可以自动通知View层进行更新,因此ViewModel层不需要持有View层的引用。ViewModel层可以看作是View层的数据模型和Presenter层的结合。
MVVM模式与MVP模式最大的区别在于:ViewModel层不持有View层的引用。这样进一步降低了耦合,View层代码的改变不会影响到ViewModel层。
MVVM模式相对于MVP模式主要有如下优点:
- 进一步降低了耦合。ViewModel层不持有View层的引用,当View层发生改变时,只要View层绑定的数据不变,那么ViewModel层就不需要改变。而在MVP模式下,当View层发生改变时,操作视图的接口就要进行相应的改变,那么Presenter层就需要修改了。
- 不用再编写很多样板代码。通过官方的Data Binding库,UI和数据之间可以实现绑定,不用再编写大量的findViewById()和操作视图的代码了。总之,Activity/Fragment的代码可以做到相当简洁。
例子
下面举一个简单的例子来实践MVVM模式。完整的项目代码可以去GitHub上查看:
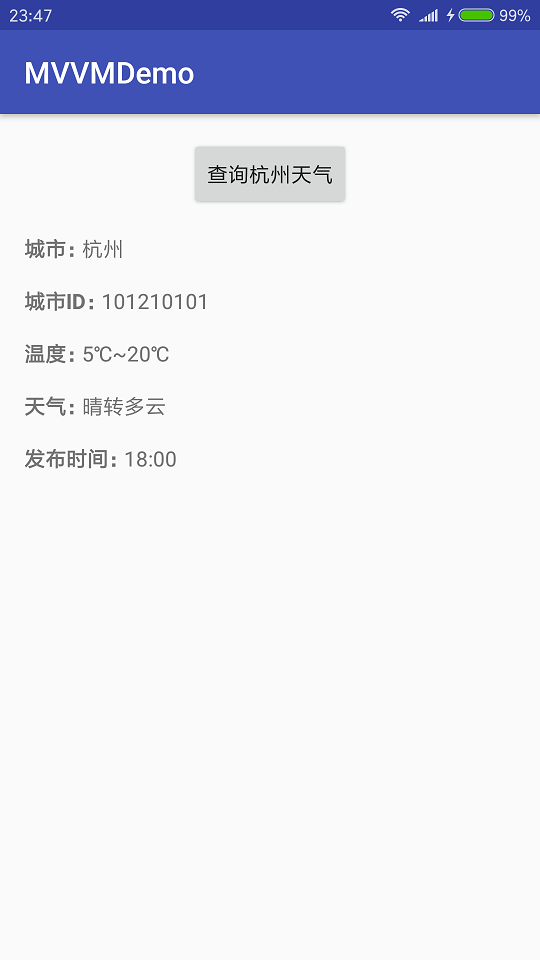
例子实现的主要功能是:点击按钮网络查询天气,查询成功后在界面上显示天气信息。主界面如下图所示:

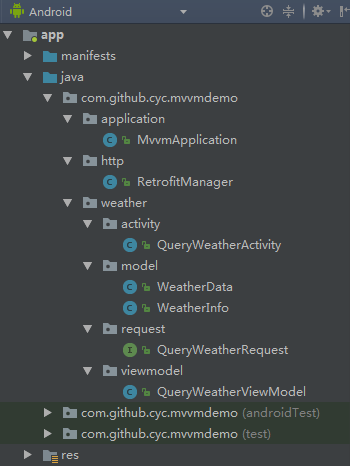
MVVM模式的代码组织结构建议按照 业务功能 进行划分,具体操作是:每个业务功能独立一个包存放,每个业务功能包下面再按Model、View、ViewModel分包存放。所有的Model存放在model包下面,所有的Activity和Fragment存放在activity包下面,所有的ViewModel存放在viewmodel包下面。该例子比较简单,只有一个weather业务功能模块,最终的代码组织结构如下图所示:
 编写Model
查询杭州天气的URL为:
访问该URL将返回一串JSON字符串,如下所示:
{"weatherinfo":{"city":"杭州","cityid":"101210101","temp1":"5℃","temp2":"20℃","weather":"晴转多云","img1":"n0.gif","img2":"d1.gif","ptime":"18:00"}}
按照此JSON字符串,可以编写相应的实体类。WeatherData类的代码如下所示:
public class WeatherData {

    private WeatherInfo weatherinfo;

    public WeatherInfo getWeatherinfo() {
        return weatherinfo;
    }

    public void setWeatherinfo(WeatherInfo weatherinfo) {
        this.weatherinfo = weatherinfo;
    }
}
WeatherInfo类的代码如下所示:
public class WeatherInfo {

    private String city;

    private String cityid;

    private String temp1;

    private String temp2;

    private String weather;

    private String img1;

    private String img2;

    private String ptime;

    public String getCity() {
        return city;
    }

    public void setCity(String city) {
        this.city = city;
    }

    public String getCityid() {
        return cityid;
    }

    public void setCityid(String cityid) {
        this.cityid = cityid;
    }

    public String getTemp1() {
        return temp1;
    }

    public void setTemp1(String temp1) {
        this.temp1 = temp1;
    }

    public String getTemp2() {
        return temp2;
    }

    public void setTemp2(String temp2) {
        this.temp2 = temp2;
    }

    public String getWeather() {
        return weather;
    }

    public void setWeather(String weather) {
        this.weather = weather;
    }

    public String getImg1() {
        return img1;
    }

    public void setImg1(String img1) {
        this.img1 = img1;
    }

    public String getImg2() {
        return img2;
    }

    public void setImg2(String img2) {
        this.img2 = img2;
    }

    public String getPtime() {
        return ptime;
    }

    public void setPtime(String ptime) {
        this.ptime = ptime;
    }
}
编写ViewModel
ViewModel不涉及任何的视图操作,只进行业务逻辑的处理。通过官方提供的Data Binding库,当ViewModel中的数据发生变化时,UI将自动更新。QueryWeatherViewModel的代码如下所示:
public class QueryWeatherViewModel {

    private static final String TAG = "QueryWeatherViewModel";

    public final ObservableBoolean loading = new ObservableBoolean(false);

    public final ObservableBoolean loadingSuccess = new ObservableBoolean(false);

    public final ObservableBoolean loadingFailure = new ObservableBoolean(false);

    public final ObservableField<String> city = new ObservableField<>();

    public final ObservableField<String> cityId = new ObservableField<>();

    public final ObservableField<String> temp1 = new ObservableField<>();

    public final ObservableField<String> temp2 = new ObservableField<>();

    public final ObservableField<String> weather = new ObservableField<>();

    public final ObservableField<String> time = new ObservableField<>();

    private Call<WeatherData> mCall;

    public QueryWeatherViewModel() {

    }

    public void queryWeather() {
        loading.set(true);
        loadingSuccess.set(false);
        loadingFailure.set(false);

        mCall = RetrofitManager.get()
                .create(QueryWeatherRequest.class)
                .queryWeather();
        mCall.enqueue(new Callback<WeatherData>() {

            @Override
            public void onResponse(Call<WeatherData> call, Response<WeatherData> response) {
                WeatherInfo weatherInfo = response.body().getWeatherinfo();
                city.set(weatherInfo.getCity());
                cityId.set(weatherInfo.getCityid());
                temp1.set(weatherInfo.getTemp1());
                temp2.set(weatherInfo.getTemp2());
                weather.set(weatherInfo.getWeather());
                time.set(weatherInfo.getPtime());

                loading.set(false);
                loadingSuccess.set(true);
            }

            @Override
            public void onFailure(Call<WeatherData> call, Throwable t) {
                if (call.isCanceled()) {
                    Log.i(TAG, "call is canceled.");
                } else {
                    loading.set(false);
                    loadingFailure.set(true);
                }
            }
        });
    }

    public void cancelRequest() {
        if (mCall != null) {
            mCall.cancel();
        }
    }
}
编写View
View不涉及任何的业务逻辑处理,只进行界面的显示。在xml布局文件中,通过官方提供的Data Binding库,将UI与ViewModel中的数据进行绑定,当ViewModel中的数据发生变化时,UI将自动更新。xml布局文件的代码如下所示:
<?xml version="1.0" encoding="utf-8"?>
<layout xmlns:android="http://schemas.android.com/apk/res/android"
    xmlns:tools="http://schemas.android.com/tools">

    <data>

        <import type="android.view.View" />

        <variable
            name="viewModel"
            type="com.github.cyc.mvvmdemo.weather.viewmodel.QueryWeatherViewModel" />
    </data>

    <RelativeLayout
        android:layout_width="match_parent"
        android:layout_height="match_parent"
        android:padding="@dimen/default_content_padding"
        tools:context="com.github.cyc.mvvmdemo.weather.activity.QueryWeatherActivity">

        <Button
            android:id="@+id/btn_query_weather"
            android:layout_width="wrap_content"
            android:layout_height="wrap_content"
            android:layout_centerHorizontal="true"
            android:text="@string/query_weather"
            android:enabled="@{viewModel.loading ? false : true}"
            android:onClick="@{() -> viewModel.queryWeather()}" />

        <RelativeLayout
            android:id="@+id/vg_weather_info"
            android:layout_width="match_parent"
            android:layout_height="wrap_content"
            android:layout_below="@id/btn_query_weather"
            android:layout_marginTop="@dimen/query_weather_margin"
            android:visibility="@{viewModel.loadingSuccess ? View.VISIBLE : View.GONE}">

            <TextView
                android:id="@+id/tv_city"
                android:layout_width="wrap_content"
                android:layout_height="wrap_content"
                android:textStyle="bold"
                android:text="@string/city" />

            <TextView
                android:id="@+id/tv_city_value"
                android:layout_width="wrap_content"
                android:layout_height="wrap_content"
                android:layout_toRightOf="@id/tv_city"
                android:layout_alignBottom="@id/tv_city"
                android:text="@{viewModel.city}"
                tools:text="杭州" />

            <TextView
                android:id="@+id/tv_city_id"
                android:layout_width="wrap_content"
                android:layout_height="wrap_content"
                android:layout_below="@id/tv_city"
                android:layout_marginTop="@dimen/query_weather_margin"
                android:textStyle="bold"
                android:text="@string/city_id" />

            <TextView
                android:id="@+id/tv_city_id_value"
                android:layout_width="wrap_content"
                android:layout_height="wrap_content"
                android:layout_toRightOf="@id/tv_city_id"
                android:layout_alignBottom="@id/tv_city_id"
                android:text="@{viewModel.cityId}"
                tools:text="101210101" />

            <TextView
                android:id="@+id/tv_temp"
                android:layout_width="wrap_content"
                android:layout_height="wrap_content"
                android:layout_below="@id/tv_city_id"
                android:layout_marginTop="@dimen/query_weather_margin"
                android:textStyle="bold"
                android:text="@string/temperature" />

            <TextView
                android:id="@+id/tv_temp1_value"
                android:layout_width="wrap_content"
                android:layout_height="wrap_content"
                android:layout_toRightOf="@id/tv_temp"
                android:layout_alignBottom="@id/tv_temp"
                android:text="@{viewModel.temp1}"
                tools:text="5℃" />

            <TextView
                android:id="@+id/tv_tilde"
                android:layout_width="wrap_content"
                android:layout_height="wrap_content"
                android:layout_toRightOf="@id/tv_temp1_value"
                android:layout_alignBottom="@id/tv_temp"
                android:text="@string/tilde" />

            <TextView
                android:id="@+id/tv_temp2_value"
                android:layout_width="wrap_content"
                android:layout_height="wrap_content"
                android:layout_toRightOf="@id/tv_tilde"
                android:layout_alignBottom="@id/tv_temp"
                android:text="@{viewModel.temp2}"
                tools:text="10℃" />

            <TextView
                android:id="@+id/tv_weather"
                android:layout_width="wrap_content"
                android:layout_height="wrap_content"
                android:layout_below="@id/tv_temp"
                android:layout_marginTop="@dimen/query_weather_margin"
                android:textStyle="bold"
                android:text="@string/weather" />

            <TextView
                android:id="@+id/tv_weather_value"
                android:layout_width="wrap_content"
                android:layout_height="wrap_content"
                android:layout_toRightOf="@id/tv_weather"
                android:layout_alignBottom="@id/tv_weather"
                android:text="@{viewModel.weather}"
                tools:text="晴" />

            <TextView
                android:id="@+id/tv_time"
                android:layout_width="wrap_content"
                android:layout_height="wrap_content"
                android:layout_below="@id/tv_weather"
                android:layout_marginTop="@dimen/query_weather_margin"
                android:textStyle="bold"
                android:text="@string/release_time" />

            <TextView
                android:id="@+id/tv_time_value"
                android:layout_width="wrap_content"
                android:layout_height="wrap_content"
                android:layout_toRightOf="@id/tv_time"
                android:layout_alignBottom="@id/tv_time"
                android:text="@{viewModel.time}"
                tools:text="10:00" />
        </RelativeLayout>

        <ProgressBar
            android:id="@+id/pb_progress"
            android:layout_width="wrap_content"
            android:layout_height="wrap_content"
            android:layout_centerInParent="true"
            android:visibility="@{viewModel.loading ? View.VISIBLE : View.GONE}" />

        <TextView
            android:id="@+id/tv_query_failure"
            android:layout_width="wrap_content"
            android:layout_height="wrap_content"
            android:layout_centerInParent="true"
            android:text="@string/query_failure"
            android:visibility="@{viewModel.loadingFailure ? View.VISIBLE : View.GONE}" />
    </RelativeLayout>
</layout>
在Activity中,通过官方提供的Data Binding库加载布局文件,创建ViewModel,并绑定View和ViewModel。QueryWeatherActivity的代码如下所示:
public class QueryWeatherActivity extends AppCompatActivity {

    // ViewModel
    private QueryWeatherViewModel mViewModel;

    // DataBinding
    private ActivityQueryWeatherBinding mDataBinding;

    @Override
    protected void onCreate(Bundle savedInstanceState) {
        super.onCreate(savedInstanceState);
        mDataBinding = DataBindingUtil.setContentView(this, R.layout.activity_query_weather);
        // 创建ViewModel
        mViewModel = new QueryWeatherViewModel();
        // 绑定View和ViewModel
        mDataBinding.setViewModel(mViewModel);
    }

    @Override
    protected void onDestroy() {
        super.onDestroy();
        // 取消请求
        mViewModel.cancelRequest();
    }
}
总结
MVVM模式有三层:Model层主要负责数据的提供,View层主要负责界面的显示,ViewModel层主要负责业务逻辑的处理。各个层职责单一不同,但他们都结构清晰,应用起来十分的便捷
Android零基础系列教程:Android基础课程UI-动画_哔哩哔哩_bilibili
本文转自 Android | Android应用架构之MVVM模式_cyc的专栏-CSDN博客_android mvvm如有侵权,请联系删除。


 京公网安备 11010502036488号